10/10/13

Flashpoint Campaigns: Red Storm – AAR Part 1 of 5

Author: Al Sandrik

Scenario: 11 Bravo

Introduction: My name is Al Sandrik and I have been a Beta Play Tester for Flashpoint Campaigns: Red Storm (FPC:RS) since late June. So with a few months of game play experience under my belt I was asked if I would be interested in preparing an After Action Report for one of the scenarios, an opportunity I jumped at. Before I go into the actual scenario, please let me make a few comments about the game. My experience has been this is a very easy game to get into but one with lots of detail under the hood. I can honestly say I find something new to appreciate and learn with every test run, and I’m sure I will again as I play out this scenario.  We’re going to spend a bit of time with the planning and set up to help you get a feel for the detail included in the game engine. One other quick point, while the game is turn-based, I wouldn’t call it an I Go-You-Go game but rather one where you  assign orders to your subordinate’s and they carry them out during a simultaneous execution phase (WEGO). This is an important point as frequently units don’t move as quickly as you would like and orders aren’t followed as the situation evolves, just like a real world commander experiences!

Scenario: The Scenario I chose is the 11 Bravo scenario primarily because it has a little bit of everything the game has to offer, river crossings, obstacles, free units, fixed units, air strikes, choke points, helicopter units and so much more. The general situation is one where we are in the second day of a Warsaw Pact assault into West Germany. After the 8th Guards Army had broken through at Fulda, Soviet Frontal Aviation units attacked American reinforcements headed into the area with chemical weapons. This caused horrific civilian causalities and delayed the armored units heading in to stem the surging Red tide. How could the Americans buy the reinforcing units time? What resources were available to throw into the breach? It was time to call for the 11 Bravo’s! 11B was the MOS code for combat engineers and those engineers would earn their combat pay.  The 23rd Engineer Battalion Combat was at Hanau, and was tasked to build enough defenses to give the thin line of mechanized infantry a fighting chance before the 79th Guards Tank Division hit their positions.

Game Options: So after choosing the Scenario to play it is time to choose game options.

Figure 1-Scenario Options
These are the options I selected for the scenario.

This is an opt out type of menu so all of the boxes start out checked and you have to remove the checks from the options you don’t want in effect. You can see I have unchecked “Visible Enemy Units” (a Fog of War option), “Limited Staff Rule” and “Allow Browsing of Spotted Enemy Units” (also a Fog of War option). So I suspect the two Fog of War options are pretty much self-explanatory, but what is this “Limited Staff Rule?”  Quite frankly, this rule has a profound effect on the play of the game. Basically, if that box is checked and the Limited Staff Rule is turned off (NOT in effect) the player will be able to assign orders to all units under their command.  Conversely, if the rule is in effect (box unchecked) then the player will only be able to give orders to a limited number of units before electronic jamming and radio communication limitations put a halt to the orders phase.  The basic point here is with the Limited Staff Rule you really need to consider what your highest priorities are during a turn and assign those orders first. This will be important as we play the scenario. A quick side note is when I first start playing with the Limited Staff Rule in effect I thought I was going to hate it, as I am a “Type A” personality and a control freak, but honestly after playing it for just a bit I wouldn’t want to play without it!

Set Up Window: So now that I’ve chosen my options and hit the “Proceed” button I am now taken to the Set Up Window. This is where you have the opportunity to deploy units if not “Fixed” by the scenario designer.

Figure 2-Initial Set Up Screen-Op-Flashpoint-Oct-AAR-Part1
One way you can tell if you are in the “Setup Phase” is the light blue (or light red) shaded hexes indicating places where you may deploy your units.

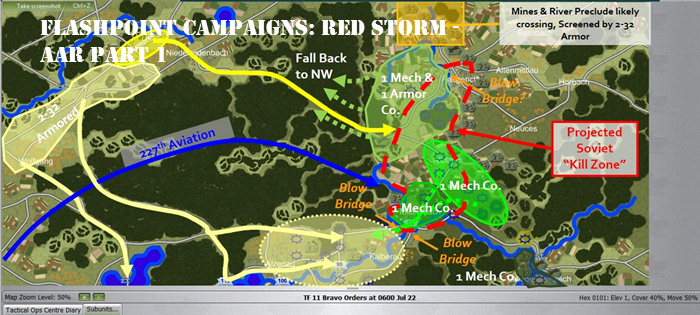
So as I review my units I can see that one Battalion, the 2-36 Mechanized Infantry Battalion, is actually free and I may (actually must) redeploy those units into the blue shaded hexes. The other battalion in the north, the 2-32nd Armored Battalion, has been fixed by the scenario designer and I will have to take that into account as I develop my strategy and deployment plan. Also note the 11 Bravos (Engineers) have done their job with the obstacles, minefields, and fortified hexes already deployed by the scenario designer. Currently only limited engineering functions (bridging/bridge demolition) are carried out by line units during game play and in the case of scatterable mines, by artillery. This also will be a part of our evaluation and strategy.

So now we need to look at the terrain we will be fighting over. I just don’t do this in the game engine/maps but like to use online Google Maps as well!  First lets look at the map in general:

Figure 3-Game Map North-Flashpoint-Oct-AAR-Part1

Continue reading

09/28/13

The GrogHeads Interview: Jim Snyder & Rob Crandall of Flashpoint Campaigns: Red Storm

fpcrs-boxGrogheads interviews the twin geniuses (geniui?) behind the new Flashpoint Campaigns: Red Storm.


GH: Since the release of Flashpoint Germany it’s been eight years. For wargamers who have been dying to get their hands on the sequel, what took so long?

Rob Crandall: There is researching the game, designing the game, coding the game, testing the game and then documenting the game. Then you decide the original concept wasn’t that great after all and you repeat the process. Keep repeating until you run out of patience and/or money. Such is the carefree life of a game developer! The costs are all upfront and the payoffs are speculative and far away so it is a real test of commitment to see it through to the very end. Worse, although many parts of the work are fun, many are no fun at all and this can really bite. It is easy to zip through the fun parts but it takes discipline to do the rest when you know it will take months and months to do so. Mercifully, I had some outstanding help and the parts that were not so fun for me were picked up by partners who could do them.

I don’t have any direct evidence but I have often thought that for every ten wargames that get talked about only one gets started. For every ten that get started maybe only one gets finished. It is just that hard.

FPRS has almost 200 design documents supporting it, I have 3,500 emails sitting in Outlook regarding it since April 2007 and there are 10,500 forum posts in the Matrix private development forums. At least 100 testers must have helped me out over the years by now. Managing all that takes time too!


GH: Flashpoint Germany used tiles for movement. Flashpoint Campaigns: Red Storm uses hexes. Why the change?

Rob Crandall: I completely rewrote the square tile system so that each tile was broken down into a 4 x 4 grid of cells. Each cell had its own graphic and was rated for all the different terrain factors. The 16 averaged together represented the tile as a whole. It was awesome and very inventive, if I say so myself, but it was still squares and was too different from everything else. Converting the underlying code to hexes took something like a weekend and I have never regretted it. The result was I had to throw away my internal map editor and go to the existing system where we paint a map in a paint program and then scan it for values based on color IDs. That is a little more cumbersome but I loved the look and also loved that it became a chore I could delegate to people with greater graphic talents than I.

Jim Snyder: The graphics fell to me and I’m not really that good compared to a real graphics artist, but what I did does work. Plus folks will be able to mod their own stuff too.

Continue reading

07/31/13

Red Menace

Developer: R. Brent Ward

Pubhlisher: White Dog Games

Author: Scott R. Krol

Can nuclear war in the ‘50s translate into an exciting solo experience?

There was a time when kids looked to the skies in fear, expecting an incoming onslaught of Soviet missiles and bombers to wipe out the world in a blaze of nuclear fire at any moment.  Today the biggest fear most kids have is not having enough Twitter followers.  Times have definitely changed since the height of the Cold War, but now everyone can relive those glorious days of duck and cover with White Dog Games’ latest title, Red Menace.  So put on a ‘I Like Ike!’ button, groove to Buddy Holly, and let’s fight the fight that never happened.

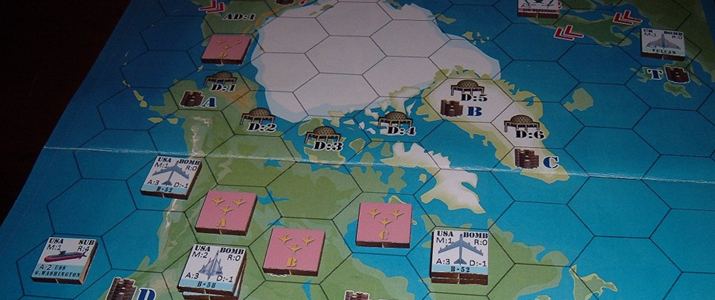
Red Menace is a solitaire board game set in the year 1959 of nuclear war between the Soviet Union and the United States, with collateral damage being spread to Canada, Greenland, Great Britain, and possibly Cuba.  The player takes on the role of supreme commander of the joint forces of the USAF, RCAF, and RAF as they try to intercept waves of Soviet bombers, controlled partly by the game,  before they drop their megadeath.   At the same time the player sends out US and British bombers to turn Soviet cities into glowing piles of slag.  Yep, family fun gaming at its most jolly!

Red-Menace-Boardgame-Review-RED_003

What you get in the boxed version.  Pretty cool components for a small company.  Print and play and folio editions are also available.

Continue reading

06/25/13

Tuesday Screenshot – Flashpoint Campaigns: Red Storm

Jim Snyder, 25 June 2013

click to enlarge

Flashpoint Campaigns: Red Storm


Soviet armor is attempting to smash through a West German defense around the city of Lauterbach. Many knocked out vehicles and squads are indicated by the little crosses on the map. Craters from artillery strikes also dot the landscape. As you can see from the screen shot the Flashpoint Campaigns game main screen in divided up into 6 areas each with  information for the player to use or access. The map is the majority of the screen and shows off all of the action in the game. At the bottom you can switch between a Subunit list showing the units composition and status or the Tac Ops Diary which gives information related to the units actions during the game.  On the right there are a number of windows providing important information. At the top we have the start turn button and the game date and time, weather and current visibility. Under that is a tabbed window with Player information, C3 information, Order of Battle, Victory Point Status, and Effects (Sounds and in-game options). Next is the current unit status window. In this case we are looking at one of the Leopard 2 tank platoons and its current conditions. At the bottom right is the mini-map. You can see the entire map, your units, VP locations and spotted enemies. At the top there is also the standard windows style menu bar with even more options.


Share your screenshots here >>