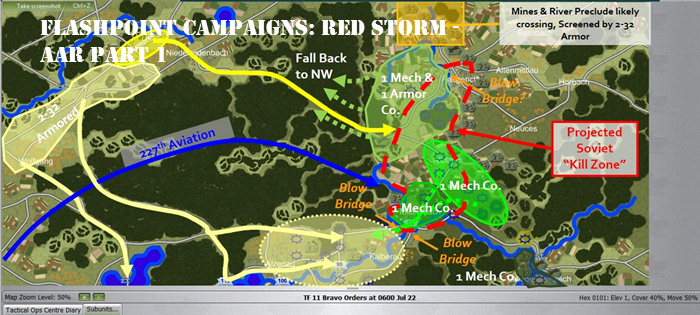
Flashpoint Campaigns: Red Storm – AAR Part 1 of 5
Author: Al Sandrik
Scenario: 11 Bravo
Introduction: My name is Al Sandrik and I have been a Beta Play Tester for Flashpoint Campaigns: Red Storm (FPC:RS) since late June. So with a few months of game play experience under my belt I was asked if I would be interested in preparing an After Action Report for one of the scenarios, an opportunity I jumped at. Before I go into the actual scenario, please let me make a few comments about the game. My experience has been this is a very easy game to get into but one with lots of detail under the hood. I can honestly say I find something new to appreciate and learn with every test run, and I’m sure I will again as I play out this scenario. We’re going to spend a bit of time with the planning and set up to help you get a feel for the detail included in the game engine. One other quick point, while the game is turn-based, I wouldn’t call it an I Go-You-Go game but rather one where you assign orders to your subordinate’s and they carry them out during a simultaneous execution phase (WEGO). This is an important point as frequently units don’t move as quickly as you would like and orders aren’t followed as the situation evolves, just like a real world commander experiences!
Scenario: The Scenario I chose is the 11 Bravo scenario primarily because it has a little bit of everything the game has to offer, river crossings, obstacles, free units, fixed units, air strikes, choke points, helicopter units and so much more. The general situation is one where we are in the second day of a Warsaw Pact assault into West Germany. After the 8th Guards Army had broken through at Fulda, Soviet Frontal Aviation units attacked American reinforcements headed into the area with chemical weapons. This caused horrific civilian causalities and delayed the armored units heading in to stem the surging Red tide. How could the Americans buy the reinforcing units time? What resources were available to throw into the breach? It was time to call for the 11 Bravo’s! 11B was the MOS code for combat engineers and those engineers would earn their combat pay. The 23rd Engineer Battalion Combat was at Hanau, and was tasked to build enough defenses to give the thin line of mechanized infantry a fighting chance before the 79th Guards Tank Division hit their positions.
Game Options: So after choosing the Scenario to play it is time to choose game options.

This is an opt out type of menu so all of the boxes start out checked and you have to remove the checks from the options you don’t want in effect. You can see I have unchecked “Visible Enemy Units” (a Fog of War option), “Limited Staff Rule” and “Allow Browsing of Spotted Enemy Units” (also a Fog of War option). So I suspect the two Fog of War options are pretty much self-explanatory, but what is this “Limited Staff Rule?” Quite frankly, this rule has a profound effect on the play of the game. Basically, if that box is checked and the Limited Staff Rule is turned off (NOT in effect) the player will be able to assign orders to all units under their command. Conversely, if the rule is in effect (box unchecked) then the player will only be able to give orders to a limited number of units before electronic jamming and radio communication limitations put a halt to the orders phase. The basic point here is with the Limited Staff Rule you really need to consider what your highest priorities are during a turn and assign those orders first. This will be important as we play the scenario. A quick side note is when I first start playing with the Limited Staff Rule in effect I thought I was going to hate it, as I am a “Type A” personality and a control freak, but honestly after playing it for just a bit I wouldn’t want to play without it!
Set Up Window: So now that I’ve chosen my options and hit the “Proceed” button I am now taken to the Set Up Window. This is where you have the opportunity to deploy units if not “Fixed” by the scenario designer.

So as I review my units I can see that one Battalion, the 2-36 Mechanized Infantry Battalion, is actually free and I may (actually must) redeploy those units into the blue shaded hexes. The other battalion in the north, the 2-32nd Armored Battalion, has been fixed by the scenario designer and I will have to take that into account as I develop my strategy and deployment plan. Also note the 11 Bravos (Engineers) have done their job with the obstacles, minefields, and fortified hexes already deployed by the scenario designer. Currently only limited engineering functions (bridging/bridge demolition) are carried out by line units during game play and in the case of scatterable mines, by artillery. This also will be a part of our evaluation and strategy.
So now we need to look at the terrain we will be fighting over. I just don’t do this in the game engine/maps but like to use online Google Maps as well! First lets look at the map in general: