Panzer Campaigns: Japan ’45 – A Grogheads AAR
The latest, hot off the press game from John Tiller Software is Panzer Campaigns Japan ’45. It covers the planned, though never actually launched, invasion of the island of Kyushu code-named Operation Olympic. Kyushu is one of the main islands in Japan and its capture was deemed a priority essential as a jumping off point to the invasion of the rest of the Japanese home islands. It fortunately never came to pass as Japan surrendered in August 1945 following defeats throughout the Pacific, military collapse in China and Manchuria, a declaration of war followed by a blitzkrieg from the Soviet Union, and to cap it off, atomic bombing of their cities by the USA. They were in a really bad place with no way of achieving strategic victory.
By: Boggit,
Japan ’45 makes the assumption that in spite of inevitable disaster looming, the Japanese government remain bullish and think they will bleed the allies white if they invade Japan, to the point they can undermine the allied will to fight and so agree to a negotiated peace. The allied war policy at the time was for the unconditional surrender of Japan at this stage of the war, but the allies had been fighting for a long time and wanted an end to the war as soon as possible without excessive losses. Can Kyushu be taken without it becoming a truly Phyrric victory? It’s a fascinating what if.
The game graphics reflect the recent facelift of John Tiller Games graphics, which some might say are long overdue, and make the game very attractive compared to the old style without losing clarity. One thing that hasn’t changed is the high quality historical research and solid gameplay characteristic of games from John Tiller Software. It’s an enjoyable game single player, but as with other games in the series the AI is not particularly strong making the optimal opponent another human player. Play by email is fully supported, and from experience of playing many games in the series multiplayer I can say it’s an easy system to use.
I’ve chosen to play the scenario Tanega Shima : First strike at the Homeland. It was to be the first action of the campaign, to silence the radar station there prior to the main invasion, and two days were rather optimistically allocated to achieving this, given the experience of fighting on Iwo Jima and Okinawa. It is a manageable scenario to report on in one article, and it features both a beach assault and inland fighting. Essentially two US regiments with support must defeat a Japanese brigade. The US get some decent naval and air support, but with a relatively small numerical advantage the US forces have a lot to do, and must watch their casualties if they want a good win.
Panzer Campaigns: Japan ‘45 has 44 standalone scenarios. 42 are unique and 2 campaigns are variants focused for the single player against the computer. The spread of scenarios covers the hypothetical Operation Olympic Kyushu campaign starting with the initial preparatory invasion on Tanega Shima slated for 1st November 1945 through to Japanese counterattacks starting on 8th December 1945. Of the scenarios six are campaigns, with one being a massive campaign covering the entire taking of Kyushu at 285 turns! It is intended for head to head play, and I doubt completion would happen anytime soon! That said I expect it can be fun taking your time as single player even if not optimized as such.
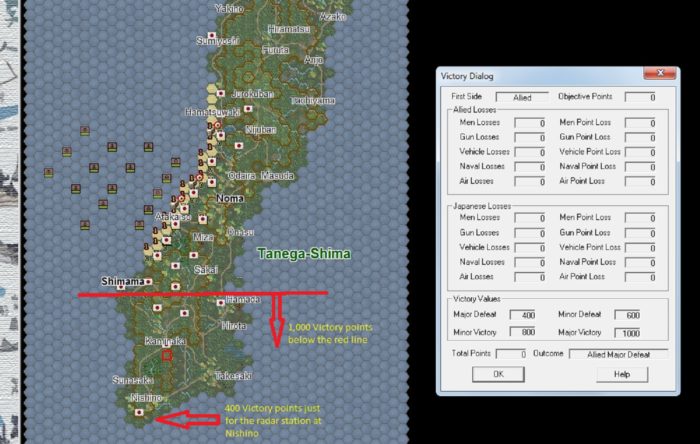
Here is the starting situation for the US Player (played by me). Here is my thinking as I formulate my strategic plan for the operation. Will it survive contact with the enemy?
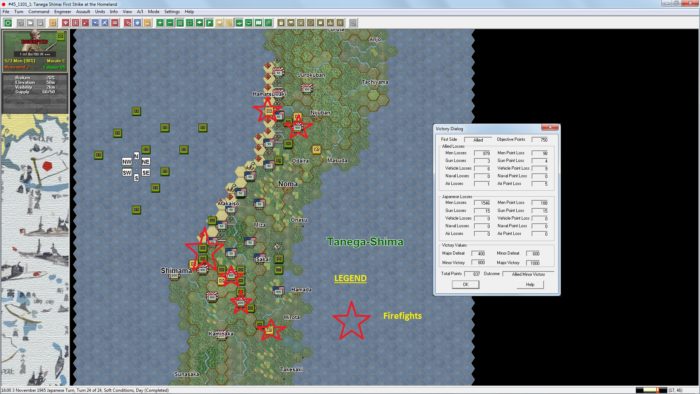
To get a major victory I need at least 1,000 victory points. I gain and lose points on casualties, but have a permanent gain from objective victory points.
So what are the issues to consider? I have a modest ground force of two US regiment sized forces with ample support facing what I expect amounts to be a dug in Japanese brigade. If I try to attack them all I will have a problem as I probably don’t have enough troops to prevail in the timeframe for the scenario. I must split their force so that I can achieve a concentration of force sufficient for a successful attack. I must also keep the ground captured secure, particularly with regard to my supply lines.
Ground conditions are soft, so movement will be hampered. I have just 24 turns to get ashore against a defended beach and break out to capture sufficient objectives without taking excessive casualties, as this will harm my score significantly.
Looking at the map, the objectives are spread over a wide area; however, below the red line is 1,000 victory points, which will give me a major victory if I can take them all. By taking some above the line the landing zone and as I advance south I create a margin for error.
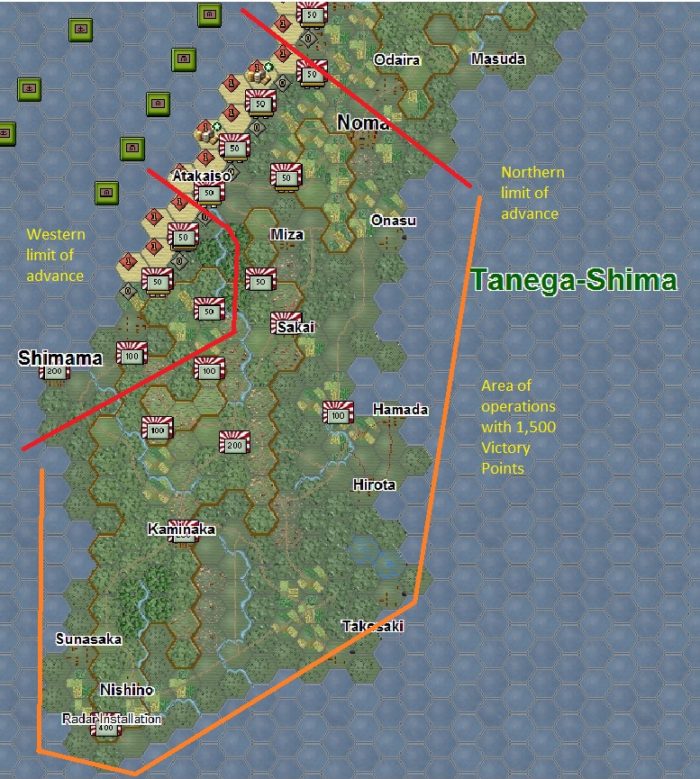
Taking this into account this is what I intend to do. My plan is to land and expand the beach head using the initial assault troops of the 158th Regimental Combat Team. I will then use the incoming second wave of the 160th Regiment to drive south. The 158th will then be rotated into a security role as 160th regiment pushes south. Depending on how things develop they may also get used as a reserve, although I think they are more likely to remain protecting objectives and the supply line if the northern Japanese forces try to frustrate the drive south by counter attacking.
So here are the operational limits I have set for myself. I have to maximize the force I have at my disposal and by concentrating the battle in a specific area I can focus the bulk of my strength against part of the enemy in the areas where it matters. If the other Japanese forces want to get involved that means they must leave any prepared positions and have the burden of attack, which will be an opportunity for my security and support assets to cause heavy casualties.
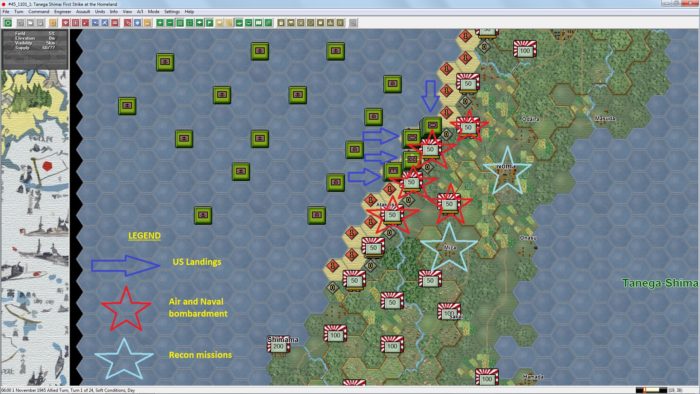
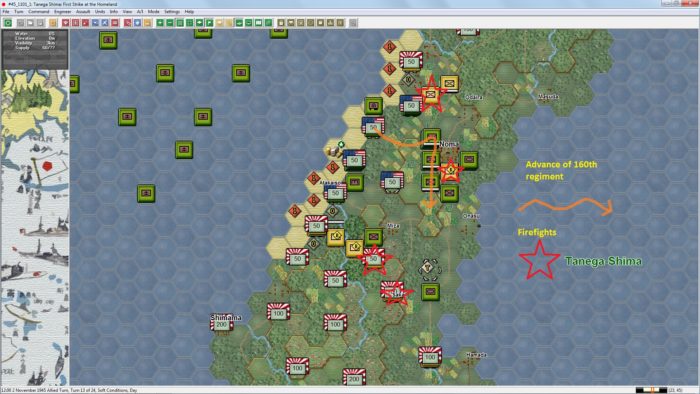
Here is the position at the end of turn one. I have bombarded four hexes on the coast prior to landing, and the one on the hill which contained some artillery. Unfortunately, two of the hexes were villages now turned to rubble, which is easier to defend. The two recon missions were undertaken were to scout out the beach exploitation area prior to moving south. After landing I took some casualties but did not initiate firing to avoid opportunity fire whilst I am on the beach. In the Japanese turn I lose a couple of tanks and some more infantry, however there are no serious consequences overall and my engineers do not rout and clear a beach minefield.
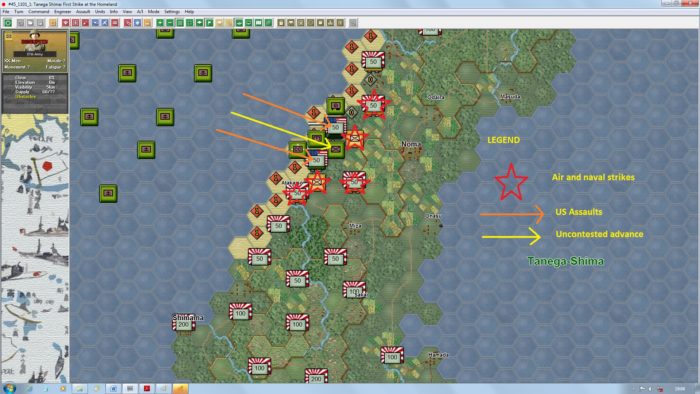
At the start of turn two all the beach defenders (which are all infantry) are disrupted, so I’m going for immediate infantry assaults with the hope of kicking out the defenders in key positions, which I’ll then bombard with support assets once in open ground. The artillery unit on the hill will also remain a priority.
The assaults go well and I push forward into the trench lines. I also manage push a battalion into the gap in between. The tanks move forward into the ruined village and the forest entrenched systems taken by the assaulting infantry, but have no spare action points to support the attack on the dislodged Japanese. The bombardments on the pushed out troops isn’t very effective, but neither is the Japanese response in their turn. It’s 10:00h on the first day and I’m not expecting the second wave until 14:00h so I think I’ll keep the 158th regimental combat team as battalions for the time being whilst they push forward. I’ll seriously have to think about breaking down into companies when the 160th infantry regiment arrives simply to cover the ground as security flank guards.
On turn 3 I continue to press forward.
In the north I support the 3rd battalion of the 158th with some tanks. The assault is successful but the tanks disrupt. My ultimate end point for them is the objective hex a couple of hexes north, which contains a trench which will be useful for holding the line. I then bring up the rest of my tanks in the hope of exploiting this attack, but they run out of action points due to the soft conditions of the field terrain. No blitzkrieg this time around! In the center and south of the line I move my infantry battalions to contact. Support assets continue to paste the usual suspects with mixed results. Having done the grindy stuff the support elements for 158th RCT turn up on the beaches without any loss, but lack the action points to move inland. I’m beginning to conclude that the soft conditions is going to act as a major drag on my offensive, so I’m rather glad to have limited my operational objectives before ambition gets the better of me.
Turn 4 sees the Japanese northern beach infantry pushed further back and 3rd battalion in contact with the objective at the northern limit of the advance. When this is taken I’ll break the battalion down into companies, spread out over that front and dig in. In the center 1st battalion overruns the artillery on the hill and is now in a position to drive either south or west. In the south after a bombardment 2nd battalion boots out the defenders of Atakaiso. I have now almost achieved my initial objectives for 158th RCT and await the arrival of 160th regiment to take things to the next level.
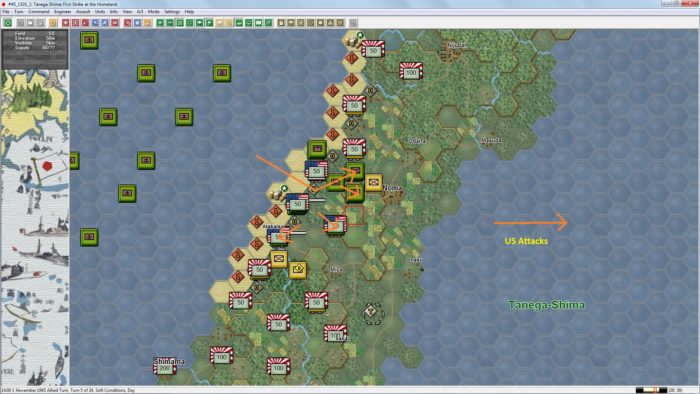
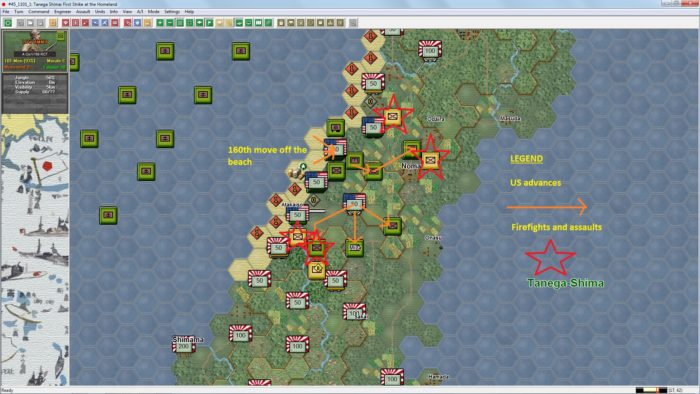
Turn 5 sees the northern group successfully assault their objective. A good result, but I lose a tank from the supporting and now disrupted platoon which is a pain. Even so the linchpin objective for the northern stop line has been achieved and the 3rd battalion will now change its mission to security, extend its frontage and dig in. In the center the 1st battalion splits into three companies and starts moving south towards Miza and east towards Onasu. The 2nd battalion meanwhile occupies Atakaiso and engages with the pushed out Japanese in a firefight (where we come off best). Finally, the lead elements of 160th regiment land, but lack the action points to move off the beach this turn. I’m getting concerned that in tactical mode I am moving very slowly due to the soft conditions. I have a long way to go yet, am likely to be opposed, and have just 18 turns remaining including night turns where I’d rather rest.
Turn 6 is unremarkable. Those units in contact resume their firefights and do best in the exchange. Miza falls and 1st battalion starts advancing south of Miza towards the hills and Sakai. On the beach the elements of 160th regiment move off the beach and go into travel mode to make use of the road in their drive to the south. Night is about to fall and I really need to decide whether at this stage I push my troops and incur the inevitable fatigue. I suspect that I’ll let them rest, save for those already in contact.
Turn 7 is mundane. I don’t actually do anything save defend in contacts with the Japanese. They come off worse. Some of my units actually recover losses and fatigue, which is great. Unfortunately none of my disrupted tank platoons rally, not that it is critical for the turn. I was hoping some of my low ammo units might have replenished, but no, it is not to be. Maybe it will happen next night turn? Turn 8 is much the same, although some disrupts and low ammo status units recover.
Turn 10 sees existing firefights largely resolve in my favour, but the only “dramatic” result is a tank platoon getting a move on towards Hamada. Unfortunately it needs the infantry to catch up. On the plus side the 160th regiment starts its march towards Hamada and the key objective area to the south of it.
Turns 11 and 12 see things slow down as fighting erupts near Sakai and the hills to the north of it. Elsewhere there is a little skirmishing, but nothing very intense. 160th regiment continues its march south.
Turn 13 sees things go well in the north with a rout of one Japanese company in an assault, and severe damage done to a reinforcing unit in travel mode. The broken unit near the 160th’s advance is wiped out. Things remain stalemated for the time being in the south.
Turn 14 is unremarkable. I fall back in the north to my defensive line and extend my frontage using companies. In the south, the firefight in the hills continues. Rather optimistically I advanced lead elements of 60th regiment in travel mode to the forward tank elements, whereupon the Japanese opened up with artillery doing a lot of damage. Turn 15 is similar to 14 in so far that existing firefights continue. 160th regiment starts to prepare to go into action in the Sakai-Hamada area. I am frustrated at the time limits, and the fact that there is still a way to go to the objectives with armed opposition ahead.
As turn 16 starts I have to make a push simply to get back on track with the objectives. I’m wondering whether I should have pushed harder with the objectives to the north and west just to get a better score. I’ll probe with the 158th RCT’s security elements and see how that goes. What was it about a plan not surviving contact? I push forward in the north and lose another tank, so just one is left in the unit. Not good. In the south I assault the unit above Sakai. It should be weak after the days fighting but I bounce and disrupt. The only consolation is that they lost more in the assault. Oh, and they’re low ammo too now. Just great…
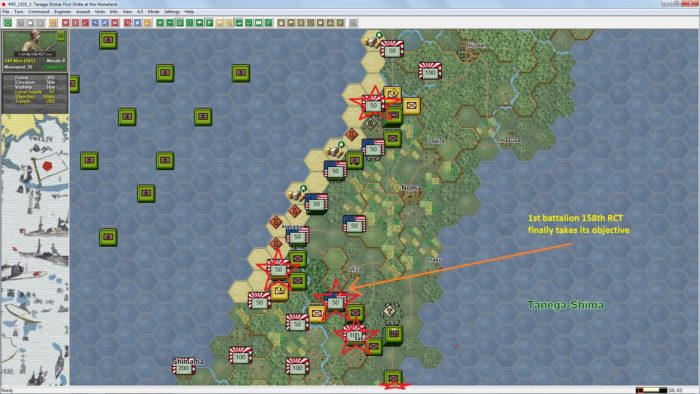
Turn 17 shows that miracles do happen. The unit that assaulted the Japanese company has recovered from both low ammo and disruption. God bless the American logistical tail and fine unit leadership. The 1st battalion 158th RCT feels inspired and assaults and takes their objective. Elsewhere we are bogged down in skirmishing.
Turn 18 sees more grinding down of the defenses, but there is little more to report this turn. Up in the north a Japanese unit holding an objective disrupts but that is about it.
Turn 19 sees successful assaults in the north and south, and Sakai falls. However, the assault near Hamada is bloody and leaves out battalion disrupted even if we did do slightly better in the assault. Unfortunately, although I have a tank unit nearby, the Japanese are entrenched in a paddy field and we have low ammo. This will lead to just more grind… Then another miracle occurs. During their turn they break leaving the objective empty! Huzzah!
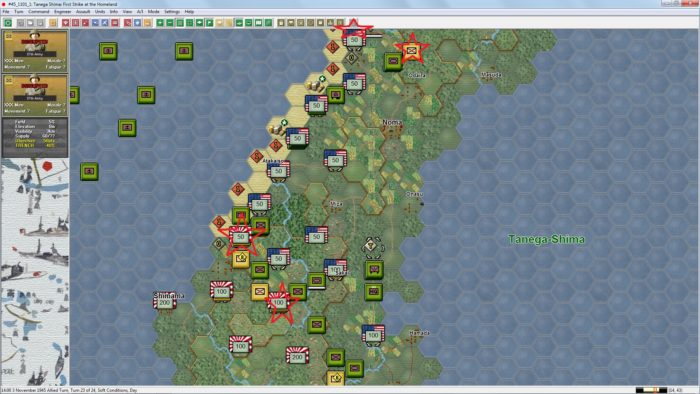
Turns 21 to 22 see me grab a couple more objectives, and in the north I make good progress plus catch a Japanese company trying to flank me on the beach. They suffer heavy losses. Even so, I’m overextended and my flank security force are actually fully engaged in the push for objectives. I run the risk of isolation, but fortunately a few tanks ride shotgun on my northern flank.
Turn 23 is one of hurry up and wait as we move up to the next set of objectives. There is some general skirmishing, but no important assaults on objectives. Our guys are tired, low on ammo and we must do one last push for turn 24.
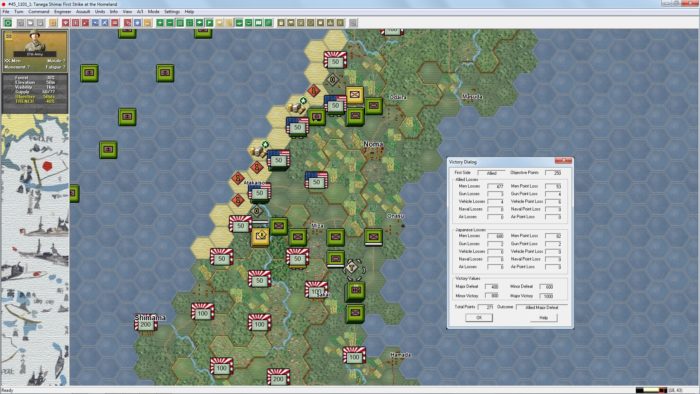
All in all Tanega Shima is a challenging scenario. On reflection, maybe I should have pushed on that first night on turns 7 and 8, although even with resting them then my guys were pretty fragged by turn 24. That said, I wonder how one can have enough time to get that major victory otherwise. This was a very challenging and enjoyable scenario. It is evenly balanced, and I think probably so whether one plays the Japanese, or the Americans, and to win you must take calculated risks as I did on turn 16 and 17.
A good game, though winning can be frustrating at times.
Chat about it below, or in our forums, or hit our FaceBook page >>


