Flashpoint Campaigns: Red Storm – AAR Part 1 of 5
Author: Al Sandrik
Scenario: 11 Bravo
Introduction: My name is Al Sandrik and I have been a Beta Play Tester for Flashpoint Campaigns: Red Storm (FPC:RS) since late June. So with a few months of game play experience under my belt I was asked if I would be interested in preparing an After Action Report for one of the scenarios, an opportunity I jumped at. Before I go into the actual scenario, please let me make a few comments about the game. My experience has been this is a very easy game to get into but one with lots of detail under the hood. I can honestly say I find something new to appreciate and learn with every test run, and I’m sure I will again as I play out this scenario. We’re going to spend a bit of time with the planning and set up to help you get a feel for the detail included in the game engine. One other quick point, while the game is turn-based, I wouldn’t call it an I Go-You-Go game but rather one where you assign orders to your subordinate’s and they carry them out during a simultaneous execution phase (WEGO). This is an important point as frequently units don’t move as quickly as you would like and orders aren’t followed as the situation evolves, just like a real world commander experiences!
Scenario: The Scenario I chose is the 11 Bravo scenario primarily because it has a little bit of everything the game has to offer, river crossings, obstacles, free units, fixed units, air strikes, choke points, helicopter units and so much more. The general situation is one where we are in the second day of a Warsaw Pact assault into West Germany. After the 8th Guards Army had broken through at Fulda, Soviet Frontal Aviation units attacked American reinforcements headed into the area with chemical weapons. This caused horrific civilian causalities and delayed the armored units heading in to stem the surging Red tide. How could the Americans buy the reinforcing units time? What resources were available to throw into the breach? It was time to call for the 11 Bravo’s! 11B was the MOS code for combat engineers and those engineers would earn their combat pay. The 23rd Engineer Battalion Combat was at Hanau, and was tasked to build enough defenses to give the thin line of mechanized infantry a fighting chance before the 79th Guards Tank Division hit their positions.
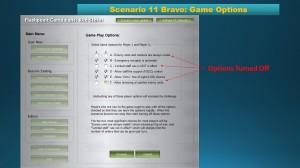
Game Options: So after choosing the Scenario to play it is time to choose game options.
This is an opt out type of menu so all of the boxes start out checked and you have to remove the checks from the options you don’t want in effect. You can see I have unchecked “Visible Enemy Units” (a Fog of War option), “Limited Staff Rule” and “Allow Browsing of Spotted Enemy Units” (also a Fog of War option). So I suspect the two Fog of War options are pretty much self-explanatory, but what is this “Limited Staff Rule?” Quite frankly, this rule has a profound effect on the play of the game. Basically, if that box is checked and the Limited Staff Rule is turned off (NOT in effect) the player will be able to assign orders to all units under their command. Conversely, if the rule is in effect (box unchecked) then the player will only be able to give orders to a limited number of units before electronic jamming and radio communication limitations put a halt to the orders phase. The basic point here is with the Limited Staff Rule you really need to consider what your highest priorities are during a turn and assign those orders first. This will be important as we play the scenario. A quick side note is when I first start playing with the Limited Staff Rule in effect I thought I was going to hate it, as I am a “Type A” personality and a control freak, but honestly after playing it for just a bit I wouldn’t want to play without it!
Set Up Window: So now that I’ve chosen my options and hit the “Proceed” button I am now taken to the Set Up Window. This is where you have the opportunity to deploy units if not “Fixed” by the scenario designer.
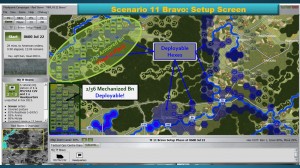
One way you can tell if you are in the “Setup Phase” is the light blue (or light red) shaded hexes indicating places where you may deploy your units.
So as I review my units I can see that one Battalion, the 2-36 Mechanized Infantry Battalion, is actually free and I may (actually must) redeploy those units into the blue shaded hexes. The other battalion in the north, the 2-32nd Armored Battalion, has been fixed by the scenario designer and I will have to take that into account as I develop my strategy and deployment plan. Also note the 11 Bravos (Engineers) have done their job with the obstacles, minefields, and fortified hexes already deployed by the scenario designer. Currently only limited engineering functions (bridging/bridge demolition) are carried out by line units during game play and in the case of scatterable mines, by artillery. This also will be a part of our evaluation and strategy.
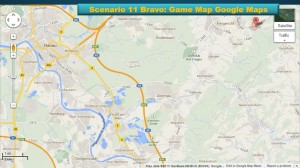
So now we need to look at the terrain we will be fighting over. I just don’t do this in the game engine/maps but like to use online Google Maps as well! First lets look at the map in general:
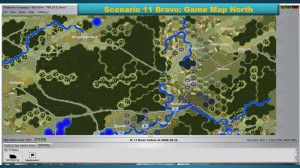
This map indicates the northern portion of the battlefield. The first aspects that should jump out at you are the line of obstacles/minefields (deployed by our 11Bs), the heavily wooded areas to the north and south of the main east-west road, and the river hexsides just behind the obstacles. Next notice the 11 Bravos have also created a series of fortifications to the west of our line of obstacles. Since obstacles are most effective if backed by covering fire we’re going to want to make use of those. But what about further south?
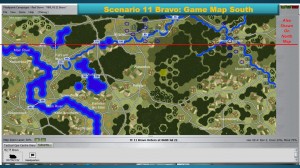
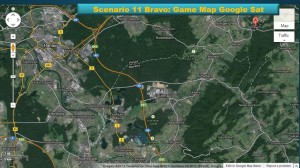
Looking to the south there is another east-west oriented roadway that leads directly to the Main River and the highest Victory Point hexes. So which route is the 8th Guards Army (8GA) likely to utilize? What about both? We’ll need to look a bit closer here to determine likely Soviet intentions. First thing that makes the northern route more likely is it is closer to the break though at Fulda. Quite simply moving through the northern portion of the map is the most direct line of march for the 79th Guards Tank Division. Are there other advantages? Let’s look Google Maps and observe the map and satellite imagery for the area:
Looking at both the most direct and easiest route via terrain looks to be the more northern route and any trek to the southern route would involve moving sideways in front of the NATO/American Defenses through Neidersteinbach and over rougher terrain and several river crossings. Maybe that isn’t a likely Soviet avenue of advance!
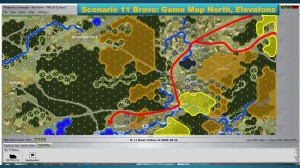
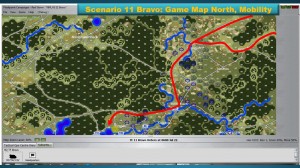
So let’s take a look at the terrain via the game maps. First let’s look at the elevations in the northern portions of the map:
I have taken this opportunity to highlight the highest elevations in orange for level 3 and yellow for level 4 elevations. When looking at the map it should jump out at you that for the most part the lowest/easiest route of advance is through the lower “valley” along the route through Michelbach as indicated in red. Yes there are a lot of rivers to cross but this is true of any Soviet route of advance in this scenario.
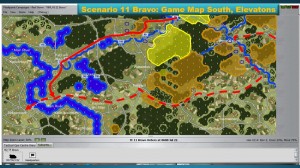
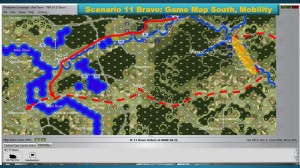
Now let’s evaluate the terrain situation to the south:
Here we see a similar situation with higher terrain in the NATO defensive belt AND note the only real route south has to go through an extensive NATO obstacle/minefield belt. Now after the Soviets clear that belt and the NATO line of resistance admittedly the terrain along a second possible route, in dashed red, is much easier, but getting there is the trick! Looks to me like the 11 Bravos have earned their pay here by reducing Soviet options!
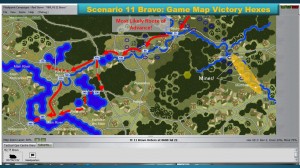
Now let’s look at mobility in both areas, and once again we see the same thing:
The solid red line and dashed red line indicate my evaluation of the most likely Soviet line of advance and the lower mobility numbers along those routes do indicate they are the most likely. Now what about the other possible routes of advance? We will take those into account and I am going to deploy my units in such a fashion that they cover those. The main plan will be to set up kill zones along the anticipated Soviet advance but with a clear plan to withdraw into tougher terrain should things go south for me. My assessment is the Soviets have no real “good” path so they will likely take the path along the northern east-west highway, along the highest Victory Point hexes (illustrated in the image below). Despite the numerous river crossings this is their best hope and those river crossings are going to be a large part of what my defense hinges on.
Deployment of Units: So now that my terrain familiarization and evaluation exercise is over (and believe me, I looked at a lot more than what I have shown here!) it is time to look over our units and actually deploy the free units. Remember in the beginning of looking at the Setup Phase map I indicated the 2-32nd Armored was fixed and the 2-36 Mechanized was free So now I have to develop a plan based on what I can do with the resources available to me. Obviously, the fixed 2-32 armored is out of position to provide an immediate defense along the main line of resistance so 2-36 Mech is the lucky unit that will get the initial call. So how will I deploy them?
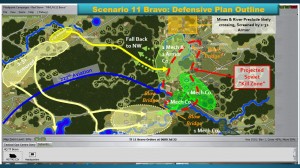
Alpha Company/2-36 will assume the position to the northwest and north of Albstadt near the Golfclub Hof Trages (see the Google Maps image above). Their general orders will be to blow the bridge immediately behind the obstacles (after the forward deployed Observation Posts cross back on turn 1) and then hold the area falling back to the northwest into the heavily wooded area. They will be reinforced by Delta/2-32 Armored who will flank the Soviet advance. Also all available mortar units will provide a smoke screen for the scout unit assigned to blow the bridge during the first turn. Even though the weather is cloudy and rainy with 2000 meters visibility I want to give them the best chance possible.
Bravo Company/2-36 will screen the initial line of resistance from Albstadt south to Neidersteinbach and will withdraw to the south and west. I will have one unit construct a bridge to allow them to withdraw and then blow it (I hope) before the Soviets can cross. I don’t believe in suicide missions even for my game counters!
Charlie Company/2-36 will take up positions near Michelbach and continue the pressure on the Soviet front falling slowly back across the river as units positioned west of the river blow the two bridges west of Michelbach.
Delta Company/2-36 draws the best assignment. As I can’t be completely sure the Soviets won’t try to hit that southern route, so Delta Company will cover the obstacles/river line from Neidersteinbach southward. If necessary they will fall back to the west and help cover the line west of Michelbach but that is where three companies of 2-32nd Armored are going!
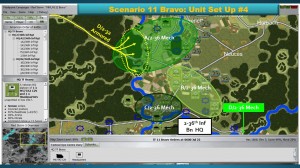
Notice in lighter yellow I indicated those three companies of 2-32 moving into positions west of Michelbach. They will cover the river line. Also I will make use of the attack and scout helicopter units attached to TF Bravo from the 227th Aviation Regt and will use both the scatterable minefields and neutralizing attacks from the 94th Artillery Battalion to cause the Soviet advance even more problems.
Overall, I don’t expect this defense to be a cakewalk but fairly feel confident the terrain and assets available to me will allow me to hold them along the river going through Michelbach. If they break through there I do have one more ridge line to the west of there to hinge the defense of the surviving units. Failing in that, once the Soviets are outside of my kill zones they will be free to run wild!
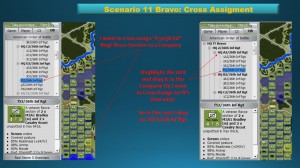
Now that I have a plan I need to look over my Order of Battle (OB) and conduct any cross assignments. One of the things I would like to do is assign some of the M3A1 Bradley scout units to the infantry companies. To do this, in the OB menu, one simply needs to drag the unit to the HQ you want to assign it to:
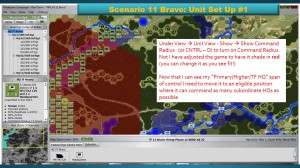
Now the next thing I do is to move the primary Headquarters to a place where its command and control radius can support as many subordinate command units as possible. In order to do that I go into the into the “View” menu to “Unit View” and the “Command Radius” menu turning that on:
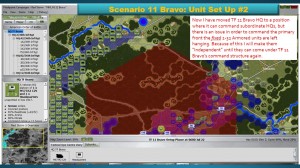
I will now move it into its command position where it can command as many subordinate units as possible. I place the unit in a position west of Michelbach where it can command the 2-36 Mech Hq:
Now remember I can only place my headquarters in hexes allowed by the scenario designer (light blue hexes). So that means I have to compromise somewhere. In my opinion it is more important that 2-36 Mech Bn be commanded along the length of its operations area than 2-32 Armored, so I will temporarily make 2-32 an independent unit until its companies can be brought under proper command. Delta Co/2-32 will be assigned to 2-36 Mech Bn HQ when it gets into range and the balance of 2-32 Armored will come back under TF Bravo when it comes within range.
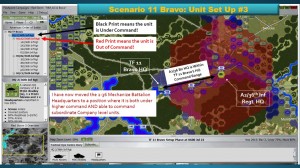
So now that the Primary Headquarters has been placed I move down to the 2-36 Battalion Headquarters (images below) and further down subordinate units ensuring everyone is in command (colored black on the OB menu) when placed.
Finally I place the mechanized units from 2-36 Battalion in the positions according to my plan and we’re finally ready to fight.
So I hope you can see there is a lot to consider even before the first electronic bullet flies! Check back soon for Part 2 to see how my plan works.
Want to share your thoughts? Have questions? Post them in our forums >>



11Bs are infantry, not combat engineers.
Sorry was following the Game Scenario description. To be honest I was USN assigned TAD to the USMC in Beirut in 1983. Ask me to fill as sandbag or build a bunker and I’m your guy. ask me to sweep a mine field or dig an AT ditch and you’re screwed. So sorry about the MOS mix up (and I learned a public lesson about being too specific about those things). The interesting thing is the gentleman who designed the scenario WAS a Combat Engineer in Germany in the late 80s. Could the MOS have changed for some reason between 1989 and today?
I hope that is the worst mistake made, and hopefully no one is insulted by the MOS issue as no offense was intended.
12B has always been Combat Engineer, 11B has always been Infantry. MOS has always been that way. The 12B went away when we changed over to the Modular Brigade and they decided that all engineers can do the same job. Just like there is no longer 11H or 11M MOS’s for the Infantry.
[…] Part 1 Al took considerable time examining the map and developing a strategy to defend against a Soviet attack. Today in Part 2 he describes the opening moves of the Soviets […]